Building a Budget-Friendly Wi-Fi Smart Home Button
Have you ever wanted a simple, budget-friendly smart home button to control your automations? I did, and after exploring some expensive options online, I decided to create my own. This post will walk you through how I built a “poor man’s” Wi-Fi button using an ESP8266 controller, a bit of coding, and a 3D-printed case.
Why Build Your Own Wi-Fi Button?
The smart buttons available on Amazon typically range from 20 to 30 euros or more. I wanted a more affordable solution to control various automations in my Home Assistant setup, so I turned to the ESP8266, a versatile and inexpensive microcontroller.
What You’ll Need
• ESP8266 Controller - I got mine here for EUR 4.69 incl. shipping • Mini Push Button - something like this • Soldering Iron • Micro USB Cable • Power Source (USB Power Plug) • 3D Printer (optional, for the case) • Arduino IDE • Wi-Fi Network
I sourced my components from eBay Germany.
Assembly
Connecting the Button
Solder the Button: Solder the push button directly onto the ESP8266. Connect one terminal to a ground port and the other to one of the GPIO pins. No extra resistance needed.
Power Supply: The ESP8266 needs to be connected to a micro USB for power since it doesn’t have self-sufficient power. Any USB power plug should work.
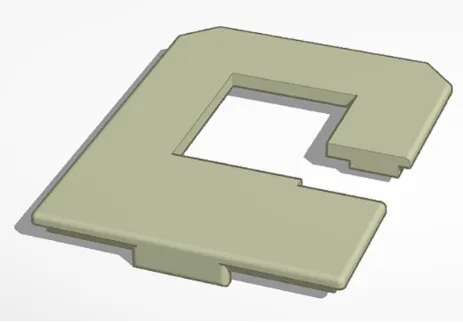
3D Printed Case
I found a case design for the ESP8266 on Thingiverse and modified it to include a cutout for the button:
Coding the Button
Using the Arduino IDE on my MacBook, I wrote a simple sketch to connect the button to Home Assistant. Here’s a snippet of the code:
#define BUTTON_PIN 0 // GPIO0
#include
// Replace with your SSID and Password const char* ssid = "your_SSID"; const char* password = "your_PW";
void setup() { pinMode(BUTTON_PIN, INPUT_PULLUP); Serial.begin(9600);
initWifi(); }
void loop() { int buttonState = digitalRead(BUTTON_PIN); if (buttonState == LOW) { Serial.println("Button pressed!"); toggleInputBoolean(); } delay(100); }
void initWifi() { Serial.print("Connecting to: "); Serial.print(ssid); WiFi.begin(ssid, password);
int timeout = 10 * 4; // 10 seconds while(WiFi.status() != WL_CONNECTED && (timeout-- > 0)) { delay(250); Serial.print("."); } Serial.println("");
if(WiFi.status() != WL_CONNECTED) { Serial.println("Failed to connect, going back to sleep"); }
Serial.print("WiFi connected in: "); Serial.print(millis()); Serial.print(", IP address: "); Serial.println(WiFi.localIP()); }
void toggleInputBoolean() { if (WiFi.status() == WL_CONNECTED) { // Check WiFi connection status WiFiClient client; // Create an instance of the WiFiClient class HTTPClient http; // Declare an object of class HTTPClient
// JSON payload StaticJsonDocument<200> jsonDoc; jsonDoc["entity_id"] = "input_boolean.esp_toggle"; String requestBody; serializeJson(jsonDoc, requestBody);
http.begin(client, "http://homeassistant.local:8123/api/services/input_boolean/toggle"); // Specify request destination using WiFiClient http.addHeader("Content-Type", "application/json"); // Specify content-type header http.addHeader("Authorization", "Bearer xxx.xxx.xxx"); // Authorization header
int httpCode = http.POST(requestBody); // Send the request and receive the response code
if (httpCode > 0) { // Check the returning code String payload = http.getString(); // Get the request response payload Serial.println(payload); // Print the response payload } else { Serial.println("Error on HTTP request"); }
http.end(); // Close connection } else { Serial.println("Error in WiFi connection"); } }
Wi-Fi Settings
The Wi-Fi settings are hardcoded into the sketch. Ensure you replace your_SSID and your_PASSWORD with your actual Wi-Fi credentials.
Practical Applications
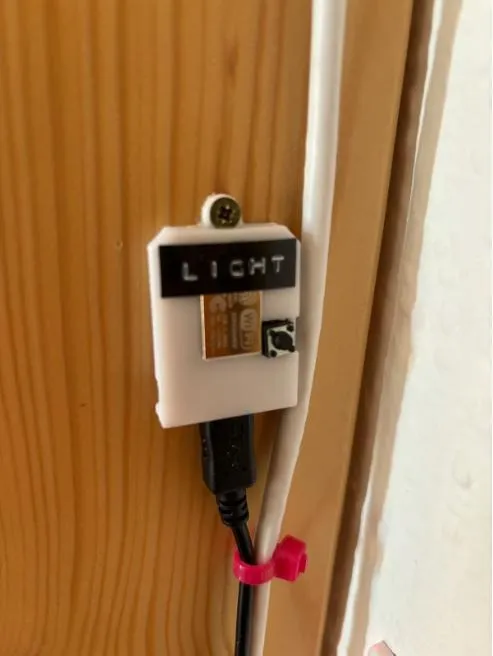
I primarily use this button to control various lights in my home. With a single press, I can trigger different scenes set up in Home Assistant. However, the button can be configured to trigger any automation you prefer.
Learning Experience
Building this Wi-Fi button was not only cost-effective but also a great learning experience. I gained insights into soldering, coding for the ESP8266, and integrating with Home Assistant.
Final Thoughts
This DIY Wi-Fi button is a simple, affordable solution for adding smart controls to your home. Whether you’re turning lights on and off or triggering more complex automations, this button can handle it all.